Hello,
Today I got the following error when tried to open a vmware virtual machine:
Could not open virtual machine: C:\vm\cent4\Red Hat Enterprise Linux 4.vmx.
This virtual machine appears to be in use.
To fix this error I have found that it is enough to delete a lck file
from the "C:\vm\cent4\Red Hat Enterprise Linux 4.vmx.lck\" directory.
Thanks,
Sergey.
Sunday, March 23, 2008

Thursday, March 20, 2008
How to truncate all tables in a schema which contain foreign key constraints:
1. Connect as system to a database, however it is possible to perform these scripts from another account which has got enough privileges.
2. Prepare scripts for disabling and enabling foreign key constraints.
2.1. The first script includes the output of the following query:
SELECT 'ALTER TABLE'||' '||owner||'.'||table_name||' DISABLE CONSTRAINT '||constraint_name||' ;' FROM dba_constraints WHERE constraint_type = 'R' and owner='name of schema' and status = 'ENABLED';
Let's name the output of this query as disable_constraints.sql
2.2. The second script includes the output of a very similar query.
SELECT 'ALTER TABLE'||' '||owner||'.'||table_name||' ENABLE CONSTRAINT '||constraint_name||' ;' FROM dba_constraints WHERE constraint_type = 'R' and owner=' name of schema
Let's name the output of this query as enable_constraints.sql
3. Prepare scripts for truncating all tables in the schema.
SELECT 'TRUNCATE TABLE '||OWNER||'.'||TABLE_NAME||' ;' FROM DBA_TABLES WHERE OWNER='name of schema';
Name the output of this query as truncate_tables.sql
4. Run these scripts in the following order:
@disable_constraints.sql
@truncate_tables.sql
@enable_constraints.sql
That's it.
Thanks,
Sergey.
2. Prepare scripts for disabling and enabling foreign key constraints.
2.1. The first script includes the output of the following query:
SELECT 'ALTER TABLE'||' '||owner||'.'||table_name||' DISABLE CONSTRAINT '||constraint_name||' ;' FROM dba_constraints WHERE constraint_type = 'R' and owner='
Let's name the output of this query as disable_constraints.sql
2.2. The second script includes the output of a very similar query.
SELECT 'ALTER TABLE'||' '||owner||'.'||table_name||' ENABLE CONSTRAINT '||constraint_name||' ;' FROM dba_constraints WHERE constraint_type = 'R' and owner='
Let's name the output of this query as enable_constraints.sql
3. Prepare scripts for truncating all tables in the schema.
SELECT 'TRUNCATE TABLE '||OWNER||'.'||TABLE_NAME||' ;' FROM DBA_TABLES WHERE OWNER='name of schema';
Name the output of this query as truncate_tables.sql
4. Run these scripts in the following order:
@disable_constraints.sql
@truncate_tables.sql
@enable_constraints.sql
That's it.
Thanks,
Sergey.
How to change the location of oraInventory.
If you want to change the location of oraInventory you need just put a new location in the /var/opt/oracle/oraInst.loc (on Solaris) in the inventory_loc variable and move the oraInventory directory from the old place to the new one.
Thanks,
Sergey.
Thanks,
Sergey.
Tuesday, March 18, 2008
How to import a schema from a dump file and ignore all data in tables.
If you need to import schema without data from a dump file you should follow the following routine:
1. Extract the DDL script of this schema from the dump file:
imp file=exp_file.dmp indexfile=ddl_script.sql userid=system/xxxxxxxx@destination_db fromuser=dmp_user touser=dest_user
Where:
exp_file.dmp – the oracle dump file.
ddl_script.sql – the DDL script which will include all DDL commands of this schema.
xxxxxxxx – system password.
destination_db – an oracle tnsnames alias of the destination database. We could omit it if we are doing import on the same computer where the database is with proper environment variables.
dmp_user – user name in the dump file.
dest_user – user name in the destination database.
2. After the ddl_script.sql file is ready you should remove the REM comments from it.
3. Connect as dest_user to the destination database and execute the ddl_script.sql script. Now we have the non-populated schema without PL/SQL code.
4. Import the dump file on the dest_user schema using the following command:
imp file= exp_file.dmp IGNORE=N userid=system/xxxxxxxx fromuser=dmp_user touser=dest_user
Using IGNORE=N flag we skip all inserts and keep having empty tables however PL/SQL code will be imported.
That’s it.
Thanks,
Sergey.
1. Extract the DDL script of this schema from the dump file:
imp file=exp_file.dmp indexfile=ddl_script.sql userid=system/xxxxxxxx@destination_db fromuser=dmp_user touser=dest_user
Where:
exp_file.dmp – the oracle dump file.
ddl_script.sql – the DDL script which will include all DDL commands of this schema.
xxxxxxxx – system password.
destination_db – an oracle tnsnames alias of the destination database. We could omit it if we are doing import on the same computer where the database is with proper environment variables.
dmp_user – user name in the dump file.
dest_user – user name in the destination database.
2. After the ddl_script.sql file is ready you should remove the REM comments from it.
3. Connect as dest_user to the destination database and execute the ddl_script.sql script. Now we have the non-populated schema without PL/SQL code.
4. Import the dump file on the dest_user schema using the following command:
imp file= exp_file.dmp IGNORE=N userid=system/xxxxxxxx fromuser=dmp_user touser=dest_user
Using IGNORE=N flag we skip all inserts and keep having empty tables however PL/SQL code will be imported.
That’s it.
Thanks,
Sergey.
Sunday, December 2, 2007
How I installed Oracle9i on CentOS4 under VMware (part 2).
Today I will continue the article "How I installed Oracle 9i on CentOS4 under VMware".
The next step is the creating OS oracle account.
# groupadd dba
# groupadd oinstall
# useradd -g oinstall -G dba oracle
# passwd oracle
Then I connected to the cent4 from the host computer using WinSCP client by oracle account and downloaded .cpio archives into the /home/oracle/distribute directory on it.
The .cpio archives had been downloaded on the host computer from the Oracle web site.
Then the following commands were launched under the /home/oracle/distribute directory:
$ gunzip *.gz
$ cpio -idmv < ship_9204_linux_disk1.cpio
$ cpio -idmv < ship_9204_linux_disk2.cpio
$ cpio -idmv < ship_9204_linux_disk3.cpio
The output of these commands are 1288238, 1263504, 585396 blocks accordingly.
Then .cpio files could be deleted:
$ rm ship_9204_linux_disk?.cpio
Accordingly to the Oracle documentation the following packages are required.
Using the "rpm -aq" command we are able to figure out that the packages marked by "Ok" already had been installed on our system:
Ok compat-db-4.1.25-9
Ok compat-gcc-32-3.2.3-47.3
Ok compat-gcc-32-c++-3.2.3-47.3
compat-oracle-rhel4-1.0-3
compat-libcwait-2.0-1
Ok compat-libgcc-296-2.96-132.7.2
Ok compat-libstdc++-296-2.96-132.7.2
Ok compat-libstdc++-33-3.2.3-47.3
Ok gnome-libs-1.4.1.2.90-44
gnome-libs-devel-1.4.1.2.90-44
libaio-devel-0.3.102-1
libaio-0.3.102-1
Ok make-3.80-5
openmotif21-2.1.30-11
Ok xorg-x11-deprecated-libs-devel-6.8.1-23.EL
Ok xorg-x11-deprecated-libs-6.8.1-23.EL
So, we need to install only unmarked packages.
To do it we have to navigate into the /media/cdrom/CentOS/RPMS directory
and use the "rpm -ihv " command:
# rpm -ihv libaio-0.3.105-2.i386.rpm
# rpm -ihv libaio-devel-0.3.105-2.i386.rpm
For the gnome-libs-devel-1.4.1.2.90-44.1.i386.rpm we have to install
glib-devel,
ORBit-devel,
gtk+-devel,
imlib-devel packages.
# rpm -ihv glib-devel-1.2.10-15.i386.rpm
# rpm -ihv ORBit-devel-0.5.17-14.i386.rpm
# rpm -ihv gtk+-devel-1.2.10-33.i386.rpm
# rpm -ihv imlib-devel-1.9.13-23.i386.rpm
# rpm -ihv gnome-libs-devel-1.4.1.2.90-44.1.i386.rpm
# rpm -ihv openmotif21-2.1.30-11.RHEL4.6.i386.rpm
The compat-oracle-rhel4-1.0-3 and compat-libcwait-2.0-1
can be downloaded from the Oracle web site (Patch 4198954)
So I downloaded the patch into the /root/ora_patch and installed it.
# unzip p4198954_40_LINUX.zip
# rpm -ihv compat-oracle-rhel4-1.0-5.i386.rpm
# rpm -ihv compat-libcwait-2.1-1.i386.rpm
Preparing... ###################################### [100%]
cat: /etc/ld.so.preload: No such file or directory
1:compat-libcwait ###################################### [100%]
The warning about /etc/ld.so.preload doesn't impact on installation.
Then we have to check some OS kernel parameters.
Using the "/sbin/sysctl -a | grep ... " command
I figured out that some parameters have proper values and marked them as Ok.
Ok kernel.hostname = cent4.ssldom ain.com
kernel.domainname = ssldomain fs.file-max = 32 7 679
kernel.sem = 250 32000 100 128
kernel.shmall = 2097152
kernel.shmmax = 4294967295
Ok kernel.shmmni = 4096
net.ipv4.ip_local_port_range = 1024 65000
kernel.sysrq = 1
For kernel.sem we have semmsl, semmns, semopm, semmni values accordingly.
To modify other parameters we have to insert/modify their values
in the /etc/sysctl.conf file as root.
The kernel.sysrq parameter was modified, because it already existed in the file.
And the following parameters were inserted:
### Parameters for Oracle ###
kernel.domainname = ssldomain
fs.file-max = 327679
kernel.sem = 250 32000 100 128
kernel.shmall = 2097152
kernel.shmmax = 4294967295
net.ipv4.ip_local_port_range = 1024 65000
If you install oracle 10.2 you have to add the following parameters:
net.core.rmem_default=262144
net.core.rmem_max=262144
net.core.wmem_default=262144
net.core.wmem_max=262144
And for activating new parameters the "/sbin/sysctl -p" command is used.
# /sbin/sysctl -p
net.ipv4.ip_forward = 0
net.ipv4.conf.default.rp_filter = 1
net.ipv4.conf.default.accept_source_route = 0
kernel.sysrq = 1
kernel.core_uses_pid = 1
kernel.domainname = ssldomain
fs.file-max = 327679 kernel.sem = 250 32000 100 128
kernel.shmall = 2097152
kernel.shmmax = 4294967295
net.ipv4.ip_local_port_range = 1024 65000
For oracle software I created the following directories:
[root@cent4 ~]# mkdir -p /oracle/product/9.2.0
[root@cent4 ~]# chown -R oracle.oinstall /oracle
Then as oracle I added the following parameters into the .bash_profile file.
export LD_ASSUME_KERNEL=2.4.19
export ORACLE_BASE=/oracle
export ORACLE_HOME=$ORACLE_BASE/product/9.2.0
export ORACLE_TERM=xterm
export ORACLE_SID=test1
export LD_LIBRARY_PATH=$ORACLE_HOME/lib:/lib:/usr/lib:/usr/local/lib
export PATH=$PATH:$ORACLE_HOME/bin
Then we need to reconnect to oracle session to activate these new parameters.
Now we are ready to execute runInstaller program
from the /home/oracle/distribute/Disk1 directory.
I executed the runInstaller from the X-Windows system.
To do it I started Cygwin session on my host computer,
launched startx command from it,
and then executed "xhost +" from the xterm window which appeared when startx was started.
Then added a line about my host computer into the /etc/hosts file of cent4 as root.
For example:
192.168.1.67 host-comp.ssldomain.com host-comp
Then as oracle ran the following command:
[oracle@cent4 Disk1]$ export DISPLAY=host-comp:0.0
Launched the ./runInstaller command.
[oracle@cent4 Disk1]$ ./runInstaller
Clicked"Next" in the first window,
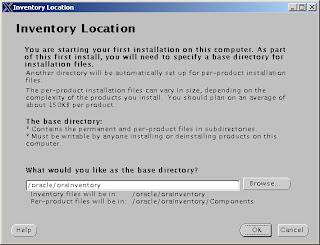
then clicked "Ok" in the "Inventory Location" window.
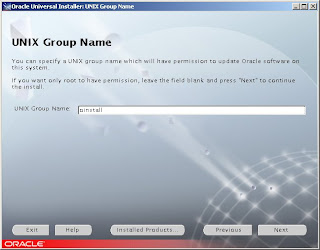
The oinstall in the oracle group name.
Executed the orainstRoot.sh script from the /tmp directory.
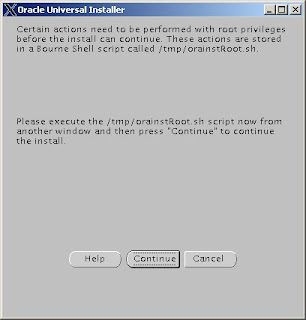
[root@cent4 tmp]# ./orainstRoot.sh
Creating Oracle Inventory pointer file (/etc/oraInst.loc)
Changing groupname of /oracle/oraInventory to oinstall.
In the "File Locations" window I pressed "Next"
Then selected "Oracle9i Database 9.2.0.4.0" in the "Available Products" window,
the "Enterprise Edition" and "Next" in the "Installation Types" window,
the "Software Only" and "Next" in the "Database Configuration" window,
and "Install" in the "Summary" window.
After a few minutes the window about the running /oracle/product/9.2.0/root.sh
appeared.
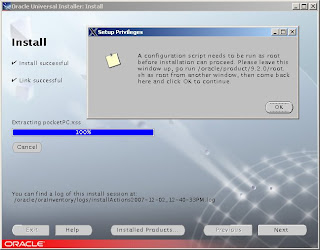
And I executed it:
[root@cent4 9.2.0]# ./root.sh
Running Oracle9 root.sh script...
\nThe following environment variables are set as:
ORACLE_OWNER= oracle
ORACLE_HOME= /oracle/product/9.2.0
Enter the full pathname of the local bin directory: [/usr/local/bin]:
Copying dbhome to /usr/local/bin ...
Copying oraenv to /usr/local/bin ...
Copying coraenv to /usr/local/bin ...
\nCreating /etc/oratab file...
Adding entry to /etc/oratab file...
Entries will be added to the /etc/oratab file as needed by
Database Configuration Assistant when a database is created
Finished running generic part of root.sh script.
Now product-specific root actions will be performed.
Then the "End of Installation" window with the following information appeared:
The following information is available in:
/oracle/product/9.2.0/Apache/Apache/setupinfo.txt
-----------------------------------------
The HTTP Server can be accessed using the following URLs:
Non SSL Mode:
http://cent4:7777
SSL mode (executed at install time):
http://cent4:7778
https://cent4:4443
Then the button "Exit" was pressed...
In the next posting we will create an oracle database.
Have fun!
Sergey.
The next step is the creating OS oracle account.
# groupadd dba
# groupadd oinstall
# useradd -g oinstall -G dba oracle
# passwd oracle
Then I connected to the cent4 from the host computer using WinSCP client by oracle account and downloaded .cpio archives into the /home/oracle/distribute directory on it.
The .cpio archives had been downloaded on the host computer from the Oracle web site.
Then the following commands were launched under the /home/oracle/distribute directory:
$ gunzip *.gz
$ cpio -idmv < ship_9204_linux_disk1.cpio
$ cpio -idmv < ship_9204_linux_disk2.cpio
$ cpio -idmv < ship_9204_linux_disk3.cpio
The output of these commands are 1288238, 1263504, 585396 blocks accordingly.
Then .cpio files could be deleted:
$ rm ship_9204_linux_disk?.cpio
Accordingly to the Oracle documentation the following packages are required.
Using the "rpm -aq" command we are able to figure out that the packages marked by "Ok" already had been installed on our system:
Ok compat-db-4.1.25-9
Ok compat-gcc-32-3.2.3-47.3
Ok compat-gcc-32-c++-3.2.3-47.3
compat-oracle-rhel4-1.0-3
compat-libcwait-2.0-1
Ok compat-libgcc-296-2.96-132.7.2
Ok compat-libstdc++-296-2.96-132.7.2
Ok compat-libstdc++-33-3.2.3-47.3
Ok gnome-libs-1.4.1.2.90-44
gnome-libs-devel-1.4.1.2.90-44
libaio-devel-0.3.102-1
libaio-0.3.102-1
Ok make-3.80-5
openmotif21-2.1.30-11
Ok xorg-x11-deprecated-libs-devel-6.8.1-23.EL
Ok xorg-x11-deprecated-libs-6.8.1-23.EL
So, we need to install only unmarked packages.
To do it we have to navigate into the /media/cdrom/CentOS/RPMS directory
and use the "rpm -ihv " command:
# rpm -ihv libaio-0.3.105-2.i386.rpm
# rpm -ihv libaio-devel-0.3.105-2.i386.rpm
For the gnome-libs-devel-1.4.1.2.90-44.1.i386.rpm we have to install
glib-devel,
ORBit-devel,
gtk+-devel,
imlib-devel packages.
# rpm -ihv glib-devel-1.2.10-15.i386.rpm
# rpm -ihv ORBit-devel-0.5.17-14.i386.rpm
# rpm -ihv gtk+-devel-1.2.10-33.i386.rpm
# rpm -ihv imlib-devel-1.9.13-23.i386.rpm
# rpm -ihv gnome-libs-devel-1.4.1.2.90-44.1.i386.rpm
# rpm -ihv openmotif21-2.1.30-11.RHEL4.6.i386.rpm
The compat-oracle-rhel4-1.0-3 and compat-libcwait-2.0-1
can be downloaded from the Oracle web site (Patch 4198954)
So I downloaded the patch into the /root/ora_patch and installed it.
# unzip p4198954_40_LINUX.zip
# rpm -ihv compat-oracle-rhel4-1.0-5.i386.rpm
# rpm -ihv compat-libcwait-2.1-1.i386.rpm
Preparing... ###################################### [100%]
cat: /etc/ld.so.preload: No such file or directory
1:compat-libcwait ###################################### [100%]
The warning about /etc/ld.so.preload doesn't impact on installation.
Then we have to check some OS kernel parameters.
Using the "/sbin/sysctl -a | grep ... " command
I figured out that some parameters have proper values and marked them as Ok.
Ok kernel.hostname = cent4.ssldom ain.com
kernel.domainname = ssldomain fs.file-max = 32 7 679
kernel.sem = 250 32000 100 128
kernel.shmall = 2097152
kernel.shmmax = 4294967295
Ok kernel.shmmni = 4096
net.ipv4.ip_local_port_range = 1024 65000
kernel.sysrq = 1
For kernel.sem we have semmsl, semmns, semopm, semmni values accordingly.
To modify other parameters we have to insert/modify their values
in the /etc/sysctl.conf file as root.
The kernel.sysrq parameter was modified, because it already existed in the file.
And the following parameters were inserted:
### Parameters for Oracle ###
kernel.domainname = ssldomain
fs.file-max = 327679
kernel.sem = 250 32000 100 128
kernel.shmall = 2097152
kernel.shmmax = 4294967295
net.ipv4.ip_local_port_range = 1024 65000
If you install oracle 10.2 you have to add the following parameters:
net.core.rmem_default=262144
net.core.rmem_max=262144
net.core.wmem_default=262144
net.core.wmem_max=262144
And for activating new parameters the "/sbin/sysctl -p" command is used.
# /sbin/sysctl -p
net.ipv4.ip_forward = 0
net.ipv4.conf.default.rp_filter = 1
net.ipv4.conf.default.accept_source_route = 0
kernel.sysrq = 1
kernel.core_uses_pid = 1
kernel.domainname = ssldomain
fs.file-max = 327679 kernel.sem = 250 32000 100 128
kernel.shmall = 2097152
kernel.shmmax = 4294967295
net.ipv4.ip_local_port_range = 1024 65000
For oracle software I created the following directories:
[root@cent4 ~]# mkdir -p /oracle/product/9.2.0
[root@cent4 ~]# chown -R oracle.oinstall /oracle
Then as oracle I added the following parameters into the .bash_profile file.
export LD_ASSUME_KERNEL=2.4.19
export ORACLE_BASE=/oracle
export ORACLE_HOME=$ORACLE_BASE/product/9.2.0
export ORACLE_TERM=xterm
export ORACLE_SID=test1
export LD_LIBRARY_PATH=$ORACLE_HOME/lib:/lib:/usr/lib:/usr/local/lib
export PATH=$PATH:$ORACLE_HOME/bin
Then we need to reconnect to oracle session to activate these new parameters.
Now we are ready to execute runInstaller program
from the /home/oracle/distribute/Disk1 directory.
I executed the runInstaller from the X-Windows system.
To do it I started Cygwin session on my host computer,
launched startx command from it,
and then executed "xhost +" from the xterm window which appeared when startx was started.
Then added a line about my host computer into the /etc/hosts file of cent4 as root.
For example:
192.168.1.67 host-comp.ssldomain.com host-comp
Then as oracle ran the following command:
[oracle@cent4 Disk1]$ export DISPLAY=host-comp:0.0
Launched the ./runInstaller command.
[oracle@cent4 Disk1]$ ./runInstaller
Clicked
then clicked "Ok" in the "Inventory Location" window.

The oinstall in the oracle group name.

Executed the orainstRoot.sh script from the /tmp directory.

[root@cent4 tmp]# ./orainstRoot.sh
Creating Oracle Inventory pointer file (/etc/oraInst.loc)
Changing groupname of /oracle/oraInventory to oinstall.
In the "File Locations" window I pressed "Next"
Then selected "Oracle9i Database 9.2.0.4.0" in the "Available Products" window,
the "Enterprise Edition" and "Next" in the "Installation Types" window,
the "Software Only" and "Next" in the "Database Configuration" window,
and "Install" in the "Summary" window.
After a few minutes the window about the running /oracle/product/9.2.0/root.sh
appeared.

And I executed it:
[root@cent4 9.2.0]# ./root.sh
Running Oracle9 root.sh script...
\nThe following environment variables are set as:
ORACLE_OWNER= oracle
ORACLE_HOME= /oracle/product/9.2.0
Enter the full pathname of the local bin directory: [/usr/local/bin]:
Copying dbhome to /usr/local/bin ...
Copying oraenv to /usr/local/bin ...
Copying coraenv to /usr/local/bin ...
\nCreating /etc/oratab file...
Adding entry to /etc/oratab file...
Entries will be added to the /etc/oratab file as needed by
Database Configuration Assistant when a database is created
Finished running generic part of root.sh script.
Now product-specific root actions will be performed.
Then the "End of Installation" window with the following information appeared:
The following information is available in:
/oracle/product/9.2.0/Apache/Apache/setupinfo.txt
-----------------------------------------
The HTTP Server can be accessed using the following URLs:
Non SSL Mode:
http://cent4:7777
SSL mode (executed at install time):
http://cent4:7778
https://cent4:4443
Then the button "Exit" was pressed...
In the next posting we will create an oracle database.
Have fun!
Sergey.
Subscribe to:
Posts (Atom)
